Qtp Scripts
Sorting of Elements in an Array
Sorting of Elements in an Array
'#####################################################
'Program to illustrate sorting of elements of an array
'This program takes the array boundary from the user
'Validate if it is a valid number <=10
'Get the list of elements from the user
' Validate if it is a number
' Finally Sorts and displays the contents of the array
'#####################################################
'Variable Declarations
Dim nArray(),nArrayBound
Dim nCounter, nCtr1,nCtr2
Dim nTempVar,sTempStr
Dim bFlag
'Get the number of elements as input from the user nArrayBound=inputbox("Enter a number between 5 and 10"
'Validate the input (if it is a valid number)
bFlag=False
Do While bFlag=False
If isNumeric(nArrayBound) Then 'Valid number
If nArrayBound<=10 Then 'Lesser than 10
If nArrayBound>=5 Then 'Greater than 5
bFlag=True
Else
bFlag=False
nArrayBound=inputbox("Enter a number greater than 5")
End If
Else
bFlag=False
nArrayBound=inputbox("Enter a number Less than or equal to 10")
End If
Else
bFlag=False
nArrayBound=inputbox("Enter a valid number")
End If
Loop
'Redim the array decalred with the number of elements
ReDim nArray(nArrayBound-1) ' -1 because the array index starts with 0
nArrayBound=cint(ubound(nArray)) 'moving the upper boundary of the array to a variable
For nCounter=0 to nArrayBound
'Get the elements of the array from the user
nArray(nCounter)=inputbox("Enter the Array Element #"&nCounter)
'Validate the input (if it is a valid number)
bFlag=False
Do While bFlag=False
If isNumeric(nArray(nCounter)) Then ' Checking if the input is a number
bFlag=True
Else
bFlag=False
nArray(nCounter)=inputbox("Enter a valid number")
End If
Loop
Next
For nCtr1=0 to cint(ubound(nArray)) 'To track the current elemtent
For nCtr2 = nCtr1+1 to cint(ubound(nArray)) ' The other elements in the Array
If cint(nArray(nCtr2))< cint(nArray(nCtr1)) Then ' Check which one is smaller
'Swap the elements
nTempVar = nArray(nCtr1)
nArray(nCtr1)=nArray(nCtr2)
nArray(nCtr2)=nTempVar
End If
Next
Next
sTempStr="Sorted list : "
For nCounter=0 to ubound(nArray)
'Putting the sorted elements in a string
sTempStr=sTempStr&nArray(nCounter)&", "
Next
Msgbox(sTempStr)
'#######################
'#### Sample Result #####
'#######################
' Sorted list: -8, -2,0,1,4,4,7,
'##### End of Script######
VBScript Program to reverse a string without using strreverse
'Program to reverse a string without using strreverse MyStr = inputbox("Enter the String:") nCnt = Len(MyStr) For i = 1 to nCnt RevStr = Mid(MyStr,i,1)&RevStr Next Msgbox RevStrVBScript code to check if a string is Palindrome or not
'Program to check if the given string is a Palindrome or not MyStr=Ucase(inputbox("Enter the String:")) RevStr=strreverse(MyStr) if strcomp(MyStr,RevStr)=0 then msgbox "It is a Palindrome" else msgbox "It is not a Palindrome" end ifVBScript: Listing the prime numbers
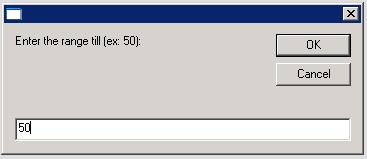
'VBScript program to display the prime numbers PrimeNumberLimit = inputbox("Enter the range till (ex: 50):") 'Getting the limit as an input from the user PrimeNumberList="Prime number list is:" 'Initialising the list of prime numbers For Ctr1=1 to PrimeNumberLimit PrimeFlag=True ' Initialising a Flag variable If Ctr1>=4 Then For Ctr2=2 to Ctr1/2 If Ctr1 mod Ctr2 = 0 Then 'Checking the reminder PrimeFlag=False 'Not a prime number End If Next End If If PrimeFlag=True Then PrimeNumberList=PrimeNumberList&" "&Ctr1 'Collecting the prime numbers End If Next Msgbox PrimeNumberList 'Displaying the resultProgram Explained Line 2: Getting the input from the user and storing it in a variable. Sample output:
Line 5: Initializing the list of prime numbers in a string. Line 8: Checking for all the numbers starting from 1 till user's input Line 10: Initializing a flag variable. Line 13: Excluding 1,2,3 the first three prime numbers. Lines 15-22: Checking for the reminder, and if it is zero we conclude it is not a prime number. Lines 28-33: Collecting all the prime numbers in a string. Line 37: Displaying the list of prime numbers. Result:
Validating an input from the user
'The following code illustrates how an input can be validated in VBScript. This example program demonstrates how to validate for a numeric value between 5 and 10 nInputNumber=inputbox("Enter a number between 5 and 10") 'Validate the input (if it is a valid number) bFlag=False Do While bFlag=False If isNumeric(nInputNumber) Then 'Valid number If nInputNumber<=10 Then 'Lesser than 10 If nInputNumber>=5 Then 'Greater than 5 bFlag=True Else bFlag=False nArrayBound=inputbox("Enter a number greater than or equal to 5") End If Else bFlag=False nArrayBound=inputbox("Enter a number Less than or equal to 10") End If Else bFlag=False nArrayBound=inputbox("Enter a valid number") End If Loop Msgbox "All Conditions Satisfied"Program Explained: The above code illustrates how an input can be validated in VBScript. This example program demonstrates how to validate for a numeric value between 5 and 10. I have explained the executable lines below: Line 3: We use an Input box to get a value from the user and store it in a variable nInputNumber Line 7: We set the bFlag variable as false, this variable is a falgging boolean varible which will be set as true when our conditions are satisfied. Line 9: (Do Loop) Looping the statements until our conditions are satisfied (Numeric Value & greater than or equal to 5 & less than or equal to 10) Line 11: (If isNumeric(nInputNumber)) Checking for condition 1 - Is it a number? Line 13: (If nInputNumber<=10) Checking for condition 2 - Is it Less than or equal to 10? Line 11: (If nInputNumber<=10) Checking for condition 1 - Is it Greater than or equal to 5? Lines 16,18,24,30: Setting the bFlag (Flag) variable as True/False according to whether or not the condition is satisfied. Lines 19,25,31: Throwing of appropriate error message back to the user and getting a new input from the user Line 36: Message box confirming that it is out of loop and all the conditions are satisfied.QTP Script to update variables value from ini file
'Subprocedure to update value of ini variables value Public Sub WriteToEnvironment(sParam ,sValue) 'Declare the required variables Dim oFSO, oFile, oTxtStream, sLine, sNewTextStream, vpath 'Create the application object for FileSystemObject Set oFSO = CreateObject("Scripting.FileSystemObject") 'Declare the file input/output constants Const ForReading = 1, ForWriting = 2, ForAppending = 8 'Declare Tristate values constant used to indicate the format of the opened file Const TristateUseDefault = -2, TristateTrue = -1, TristateFalse = 0 'Get the file from the file specified in environment variable Set oFile = oFSO.GetFile(Environment("iniPath")) 'Open the ini file for reading purpose Set oTxtStream = oFile.OpenAsTextStream(ForReading, TristateUseDefault) 'Read the file till the end While Not oTxtStream.AtEndOfStream 'Read the file line by line sLine = oTxtStream.ReadLine sParameter = Array() 'Spilt the ini variable by delimiter sParameter = Split(sLine, "=") 'If the ini variable name matches to required then modify the value with new value If sParameter(0) = sParam Then sLine = sParam & "=" & sValue End If sNewTextStream = sNewTextStream & sLine & vbCrLf Wend 'close the stream object oTxtStream.Close 'Create the application object for FileSystemObject Set oFSO = CreateObject("Scripting.FileSystemObject") 'Get the file from the file specified in environment variable Set oFile = oFSO.GetFile(Environment("iniPath")) 'Open the ini file for writhing purpose Set oTxtStream = oFile.OpenAsTextStream(ForWriting, TristateUseDefault) 'Write the new stream data to file oTxtStream.Write sNewTextStream 'Close the stream object oTxtStream.Close End SubQTP code to search data from Excel sheet
Dim appExcel, objWorkBook, objSheet, columncount, rowcount, 'Create the application object for excel Set appExcel = CreateObject("Excel.Application") 'Set the workbook object by opening Set objWorkBook = appExcel.Workbooks.open("c:\Smoke_Test\SmokeTest.xls") 'Set the Worksheet object Set objSheet = appExcel.Sheets("Global") 'Get the count for total used columns columncount = objSheet.usedrange.columns.count 'Get the count for total used rows rowcount = objSheet.usedrange.rows.count 'Assign the data to search for Find_Details="Report" 'Iterate the loop through each cell to find out required data For a= 1 to rowcount For b = 1 to columncount fieldvalue =objSheet.cells(a,b) If cstr(fieldvalue)= Cstr(Find_Details) Then msgbox cstr(fieldvalue) Exit For End If Next NextQTP code to terminate all instances of Internet explorer using collections
'Code to close all Internet explorer browser process using QTP Dim oWMIService, allIExplorer,iEItem Dim strComputer strcomputer="." 'Get the WMI object Set oWMIService=GetObject("Winmgmts:\\"& strcomputer & "\root\cimv2") 'Get collection of processes for with name iexplore.exe set allIExplorer=obj.execquery("Select * from win32_process where name='iexplore.exe'") name 'Loop through each process and terminate it For each iEItem in allIExplorer iEItem.terminate Next Set allIExplorer= Nothing Set oWMIService= NothingQTP script to send an email from outlook
'Call to the function for sending the mail on mail id 'abc@abc.com' Call SendMail("abc@abc.com","Hi","Hi","") ' THis function will create an email and send it using outlook Function SendMail(SendTo, Subject, Body, Attachment) 'CreateObject method to create an Outlook Application object Set ol=CreateObject("Outlook.Application") 'Create a new outlook mail object Set Mail=ol.CreateItem(0) 'Add the email address to the recipient list of the message Mail.to=SendTo 'Add the subject of the message Mail.Subject=Subject 'Add the body of the mail message Mail.Body=Body 'Add the attachment to the mail message If (Attachment <> "") Then Mail.Attachments.Add(Attachment) End If 'Send the mail message Mail.Send 'Free up the memory ol.Quit Set Mail = Nothing Set ol = Nothing End FunctionCode to download attachment from outlook emails
'Below code goes through all the unread mails from inbox folder and download the attachment 'CreateObject method to create an Outlook Application object Set ObjO=createobject("Outlook.Application") 'GetNameSpece returns a NameSpace object of the specified type Set olns=ObjO.GetNameSpace("MAPI") 'Get the reference of inbox folder Set ObjFolder=olns.GetDefaultFolder(6) 'Iterate for all the unread mails and download the attchment from those mails For each item1 in ObjFolder.Items If item1.Unread Then For each att in item1.attachments FileName="C:\EmailData\" &att.FileName att.saveasfile FileName Next End If NextQTP script to login to Gmail using different sets of logins from datatable
In the following example there is no need of recording any scripts. Just copy paste the below script and it should work provided you meet the prerequisites. Prerequisites: 1) Ensure that you set the run settings to "Run one iteration only" 2) Create the datatable (Global sheet) parameters => Rename Columns A & B as UserName and PassWord respectively (as shown below) 3) Update the test data (Different sets of user name password combinations on the global sheet (as shown below).
QTP Data table (global sheet), click on the image to enlarge ' Program to login to Gmail using different set of logins from a datatable ' Table Structure (parameters): UserName, PassWord 'Retrieve the number of rows in the table nRowCount=DataTable.GlobalSheet.GetRowCount 'Close any existing IE browser windows systemutil.CloseProcessByName "iexplore.exe" 'For every User name Password combination For i = 1 to nRowCount 'Open a new IE browser and navigate to gmail.com Systemutil.Run "iexplore", "http://gmail.com" 'Wait for the page to load Browser("title:=.*").Page("title:=.*").Sync 'Get the current row User name and password and store it in variables DataTable.GlobalSheet.SetCurrentRow(i) sEmailid=DataTable("UserName",Global) sPassWord=Datatable("PassWord",dtGlobalSheet) 'Update the user name and password on the page and sign in Browser("title:=.*").Page("title:=.*").WebEdit("name:=Email").Set sEmailid Browser("title:=.*").Page("title:=.*").WebEdit("name:=Passwd").Set sPassWord Browser("title:=.*").Page("title:=.*").WebButton("name:=Sign in").Click Browser("title:=.*").Page("title:=.*").Sync wait(10) 'Check if the left 13 charecters of the browser title is "Gmail - Inbox" If left(browser("title:=.*").Page("title:=.*").getROProperty("title"),13) ="Gmail - Inbox"Then msgbox("Signed in Successfully") Else msgbox("Login Unsuccessful") End If 'Close the IE browser systemutil.CloseProcessByName "iexplore.exe" Next 'Result '## Message box prompting whether the login was successful or not for all the login id and password combinationHow to retrieve all the link names and URLs using QTP?
We need to use the ChildObjects method to get the collection of links. Using the collection object we can then retrieve the name and URL properties of every link. Step by Step illustration: 1) Using the ChildObjects method, get all the links on the webpage. 2) We now have the collection object ready. 3) Use the GetROProperty method to retrieve the required property values. (In our case Innertext & href) Example :
' This can be used on any page Set oLinkDesc = Description.Create() ' Retrieve HTML tag "A" oLinkDesc("html tag").Value = "A" ' Create the collection object Set nLinksCollection = Browser("title:=.*"”).Page("title:=.*").ChildObjects(oLinkDesc) nLinksCount = nLinksCollection.Count() ' Retrieve all the requied properties For i=0 to nLinksCount-1 sName = nLinksCollection(i).GetROProperty("innertext") sHref = nLinksCollection(i).GetROProperty("href"”) ' Saving the results in the reporter Reporter.ReportEvent 0, "Links name: " & sName & "; URL: " & sHref NextQTP Script to Connect to a Database
public void ConnectToDatabase() { Const adOpenStatic = 3 Const adLockOptimistic = 3 Const adUseClient = 3 Set objConn=CreateObject("ADODB.Connection") Set objRecordset=CreateObject("ADODB.Recordset") objConn.Open "DRIVER={Oracle in OraHome92};SERVER={Servername};UID={Username};PWD={Password};DBQ={Dbnmae}" objRecordset.CursorLocation = adUseClient objRecordset.Open "Select {Col name} from tablename",objConn,adOpenStatic,adLockOptimistic While not (objRecordset.EOF) objRecordset.MoveNext Msgbox "Result" & objRecordset.Fields.Item("{Col name}")& vbCrLf Wend objRecordset.Close objConn.Close Set objRecordset=Nothing Set objConn=Nothing }QTP Script to get the title of all open browsers
'QTP Script to Get the title of all open browsers Set BrowserDesc = Description.Create() BrowserDesc("application version").Value = "internet explorer 7" Set BrowserCollection = DeskTop.ChildObjects(BrowserDesc) nCnt = BrowserCollection.Count MsgBox "There are totally "&nCnt&" browsers opened" For Ctr = 0 To (nCnt -1) MsgBox "Browser : #"&Ctr&" has the title:"& BrowserCollection(Ctr).GetROProperty("title") Next Set bColl = Nothing Set bDesc = NothingHow to deal with Dynamically changing Objects in QTP?
We come across this situaltion quite frequently. How do we deal with a dynamic object/continuously changing object at the runtime. May be the object's properties are set dynamically at runtime through input parameters. We are now at a point where we cannot add this object to the OR (Object Repository). So what's the solution? It is simple, create a dynamic/runtime object. How do I define/create a dynamic object?
- First Method:(method is explained inline)
Set newObject = Description.Create 'The above line declares a new object newObject("micclass").Value = "WebElement" 'The above line sets the type of object (Browser/Page/WebElement/Link etc), in this case it is a Web Element 'The below 3 lines set the Dynamic/Runtime properties of the object newObject("html tag").Value = "SPAN" newObject("class").Value = "radio-classic-ITEM-OFF" newObject("text").Value = Parameter("Text") 'Usage of the new Object Browser("Google").Window("Google").WebElement(newObject).ClickThe following syntax can be handy for one time usage of a Dynamic Object. In this method we set the properties of the dynamic object in the same line. This is another way of implementing the above example.
- Second Method
Browser("Google").Window("Google").WebElement("html tag:=SPAN", "class:=radio-classic-ITEM-OFF", "text:=" & Parameter("Text")).ClickDatatable - Import/Export
There are 4 methods that QTP provided to Import/Export a datatable to/from an .xls file.
1) Import method : This method is used to import an entire workbook into QTP datatable.datatable.Import "D:\QTPScripts\Test_Folder\Testing.xls"'Imports the entire workbook2) ImportSheet method : This method is used to import only a specific sheet into QTP datatable.datatable.ImportSheet "D:\QTPScripts\Test_Folder\Testing.xls",1,2'Imports the source sheet (1) to destination sheet (2)3) ExportSheet method : This method is used to export only a specific datatable sheet from QTP to an .xls file.datatable.ExportSheet "D:\QTPScripts\Test_Folder\Testing.xls",1'Exports the specified sheet to a file; Overwrites by default, only one copy is exported.4) Export method : This method is used to export the entire datatables from QTP to an .xls file.datatable.Export "D:\QTPScripts\Test_Folder\Testing.xls"'Entire workbook is exportedGetTOproperties, SetTOproperty, GetTOproperty & GetROproperty - methods explained with sample scripts.
Before we get started, I would like to take some time explaining about the TO, RO, Get and Set part of the methods.TO : Stands for Test Object (The object that we have recorded in our object repository)RO : Stands for Runt-time Object (The application object we are testing against the object in the Object repository)Get : Is used to get (return) the current property/ies of a Run-time or a test object.Set : Is used to set (return) the property of a test object.GetTOproperties:This method is used to return get the properties and their corresponding values from the recorded object in our object repository.The following example explains the usage of GetTOproperties method:'################################ '### Get TO Properties Script ### '################################ systemutil.Run "iexplore.exe", "http://www.google.com" Set oWebEdit=Browser("Google").Page("Google").WebEdit("q") 'Create webedit object Set TOProperties=oWebEdit.GetTOProperties 'Get TO Properties For i = 0 to TOProperties.count - 1 'Looping through all the properties sName=TOProperties(i).Name ' Name of the property sValue=TOProperties(i).Value 'Value of the property isRegularExpression=TOProperties(i).RegularExpression 'Is it a Regular expression Msgbox sName & " -> " & sValue & "->" & isRegularExpression Next '############## '### Result:### '############## ' type -> ext -> true ' name -> q -> true '### End of Script ####SetTOproperty :This method is used to set the value of a particular property of an object in the object repository.GetTOproperty:This method is used to get the current value of a property of an object in the object repository. If we had used the SetTOproperty method to change the existing property of an object in the OR, GetTOproperty method would only retrieve the current value of the property (ie, what ever value was set using SetTOproperty).Note : Whatever value we set during the script execution is not retained after the execution is complete. The values in the OR automatically gets back to what it was at the beginning of the execution just like the run-time data tables.'############################################# '### Set TO Property & Get TO property ### '############################################# oldName = oWebEdit.GetTOProperty("name") msgbox "Old Name ->" & oldName oWebEdit.SetTOProperty "name","New Value" NewName = oWebEdit.GetTOProperty("name") msgbox "New Name ->" & NewName '############## '### Result:### '############## ' Old Name ->q ' New Name ->New Value '### End of Script ###GetROProperty:This method is used to get the runtime value of a property in an application object.Note : SetROproperty method is not supported by QTP, hence it is unavailable.'####################### '### Get RO Property ### '####################### oWebEdit=Browser("Google").Page("Google").WebEdit("q").GetROProperty("value") msgbox oWebEdit '############### '### Result: ### '############### '### The text in the webedit control is displayed '### End of Script ###